If you’re looking for a way to achieve a flawless makeup finish, look no further than the beauty blender. This small, teardrop-shaped sponge has become a staple in many makeup lovers’ routines, and for good reason. When used correctly, a beauty blender can help you achieve a natural, airbrushed look that’s hard to replicate with other application methods. In this article, we’ll walk you through everything you need to know about using a beauty blender for a flawless finish.
Introduction
Before we dive into the specifics of using a beauty blender, let’s take a moment to discuss why it’s such a valuable tool in your makeup kit. A beauty blender is designed to help you apply your makeup products evenly and smoothly, resulting in a natural-looking finish. Unlike some other application methods, a beauty blender is versatile enough to be used with a variety of products, including foundation, concealer, and even cream blushes.
The beauty blender was invented in 2003 by makeup artist Rea Ann Silva. Originally designed to help makeup artists achieve a flawless finish on their clients, it quickly became popular among everyday beauty lovers as well. Today, there are dozens of different types of beauty blenders on the market, each with its own unique shape, size, and texture.
When shopping for a beauty blender, there are a few things to keep in mind. First and foremost, you want to make sure you’re purchasing a high-quality product made from non-toxic materials. Look for beauty blenders made from latex-free foam or other safe materials. You’ll also want to consider the size and shape of the beauty blender, as well as its color.
Prepping the Skin
Before you even think about applying makeup with a beauty blender, it’s important to properly prep your skin. This will ensure that your makeup goes on smoothly and stays put throughout the day.
Start by cleansing your face with a gentle cleanser and warm water. Pat your skin dry with a clean towel, then apply a moisturizer that’s appropriate for your skin type. This will help create a smooth, hydrated base for your makeup.
If you’re planning to wear foundation, you may also want to consider using a primer. Primers help to fill in fine lines and pores, creating an even surface for your foundation to adhere to. Be sure to choose a primer that’s appropriate for your skin type and concerns.
Choosing the Right Beauty Blender
One of the most important things to consider when using a beauty blender is choosing the right one for your needs. There are a few different types of beauty blenders on the market, each with its own unique features.
The original beauty blender is a teardrop-shaped sponge that’s perfect for applying foundation and other liquid products. There are also mini beauty blenders that are designed for more precise application, as well as larger, flat beauty blenders that are great for blending out larger areas of the face.
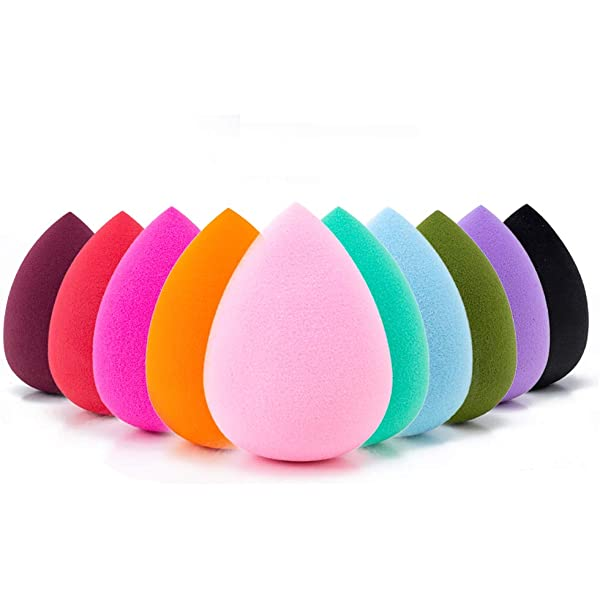
When choosing a beauty blender, you’ll also want to consider the size and color. Beauty blenders come in a range of sizes, so be sure to choose one that’s appropriate for the area of the face you’ll be applying makeup to. As for color, many beauty blenders come in a range of shades, with each shade being designed for a different purpose. For example, a pink beauty blender may be designed for applying blush, while a green beauty blender may be designed for color-correcting.
How to Use a Beauty Blender
Now that you’ve got your beauty blender and your skin is prepped and ready to go, it’s time to start applying your makeup. Here’s how to use a beauty blender for a flawless finish:
- Wet the beauty blender. Before you start applying any makeup, dampen your beauty blender with water. Squeeze out any excess water, then use a clean towel to gently squeeze out any remaining moisture. Your beauty blender should be damp, but not soaking wet.
- Dispense foundation onto the beauty blender. Using a pump or dropper, dispense a small amount of foundation onto the back of your hand or onto a clean surface.
- Apply foundation using the beauty blender. Dip the rounded end of the beauty blender into the foundation, then gently dab it onto your skin. Use a bouncing motion to apply the foundation, rather than dragging or swiping the beauty blender across your face.
- Blend the foundation. Once you’ve applied the foundation, use the beauty blender to blend it out. Use the same bouncing motion, working from the center of your face outwards. Pay special attention to any areas that require extra coverage, such as blemishes or dark circles under your eyes.
- Use a beauty blender for concealer and other makeup products. In addition to foundation, you can also use a beauty blender to apply concealer, cream blush, and other makeup products. Simply follow the same steps as you would for foundation, using the beauty blender to dab and blend the product into your skin.
Cleaning and Maintaining Your Beauty Blender
After you’ve finished applying your makeup, it’s important to properly clean and maintain your beauty blender. This will help ensure that your sponge stays in good condition and doesn’t harbor bacteria that could lead to breakouts or other skin issues.
Ideally, you should wash your beauty blender after every use. To do this, simply wet the sponge and apply a small amount of gentle cleanser. Gently work the cleanser into the sponge, then rinse it thoroughly with warm water. Squeeze out any excess water, then use a clean towel to gently squeeze out any remaining moisture. Finally, allow the beauty blender to air dry completely before using it again.
If you notice any signs of wear and tear on your beauty blender, such as cracks or tears in the foam, it’s time to replace it. While beauty blenders aren’t the most expensive makeup tool, they do need to be replaced fairly regularly to ensure optimal performance.
Common Mistakes to Avoid When Using a Beauty Blender
While a beauty blender can be a game-changer when it comes to achieving a flawless makeup finish, there are a few common mistakes that many people make when using this tool. Here are a few things to watch out for:
- Using a dry beauty blender. Your beauty blender should always be damp when you’re using it. If it’s dry, it won’t apply your makeup evenly and may even leave streaks.
- Over-blending. While it’s important to blend your makeup thoroughly, over-blending can actually cause it to look cakey and unnatural.
- Using a beauty blender for powder products. While you can technically use a beauty blender to apply powder products, it’s not the most effective method. Stick to using your beauty blender for liquid and cream products.
- Not cleaning the beauty blender regularly. As we mentioned earlier, it’s important to clean your beauty blender after every use. If you don’t, it can become a breeding ground for bacteria that could cause breakouts or other skin issues.
Conclusion
Using a beauty blender can be a great way to achieve a flawless makeup finish. By following the tips and tricks outlined in this article, you’ll be well on your way to using this tool like a pro. Remember to choose the right beauty blender for your needs, properly prep your skin before applying makeup, and clean and maintain your beauty blender regularly. Most importantly, have fun experimenting with different products and techniques to find what works best for you.
FAQs
- Can I use a beauty blender with powder products? While it’s technically possible to use a beauty blender with powder products, it’s not the most effective method. Stick to using your beauty blender for liquid and cream products.
- How often should I clean my beauty blender? Ideally, you should clean your beauty blender after every use. This will help ensure that it stays in good condition and doesn’t harbor bacteria.
- Can I use a beauty blender for blush and other cream products? Yes! A beauty blender can be a great tool for applying cream blush, highlighter, and other products. Just be sure to choose the right size and shape of beauty blender for the area of the face you’ll be applying the product to.
- What’s the best way to store my beauty blender? After you’ve cleaned and dried your beauty blender, store it in a cool, dry place. Avoid storing it in a humid bathroom, as this can lead to the growth of bacteria.
- How often should I replace my beauty blender? While there’s no hard and fast rule for when to replace your beauty blender, most experts recommend doing so every three to six months. If you notice any signs of wear and tear on your sponge, such as cracks or tears, it’s time to replace it.